
OHM'S LAW AND DC CIRCUITS
MOTIVATION:
"The strength of the shock depends rather more on the quantity of fluid which passes through our body than on the force with which it is impelled."
Cavendish, 1757
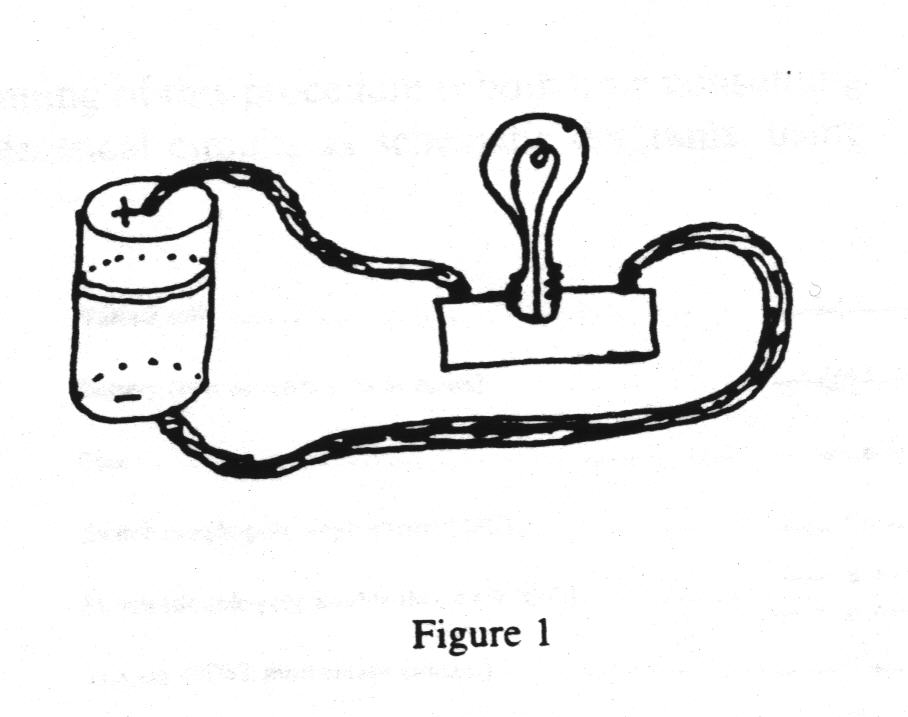
The simple electric circuit consists of three elements: (1) a source of electromotive force such as a battery; (2) a device such as a lamp which operates when an electric charge flows through it; and (3) two or more conducting paths (wires) which can be used to connect the first two items together. The advantages of electricity as a form of energy stem largely from the ease with which it can be transmitted over long distances with small losses and the readiness with which it can be converted to other forms of energy; e.g., heat, light, or mechanical energy.
But physics is a quantitative subject and the first step in working with electric circuits is that of defining such quantities as electromotive force, potential difference, current and resistance used to discuss the circuit. We begin that study in this experiment.
SPECIFIC OBJECTIVES:
When you have completed this experimental exercise you should be able to: (1) define electromotive force, potential difference, resistance and electric current, and be able to state the units in which each is measured; (2) read schematic diagrams for simple electrical circuits and construct those circuits from the diagrams; (3) use DC instruments for measuring current and potential difference correctly; (4) state Ohm's law and use it to make electrical calculations for resistors connected in series and parallel; and (5) compute the equivalent resistance for series and parallel combinations of resistors.
THEORY:
An electrical circuit is a means of transferring energy from one point to another and/or converting it from one form to another. A source of electromotive force is any device which produces a separation of positive (+) and negative (-) charges at the expense of some "non-electrical" form of energy. Thus a battery has (+) and (-) charges on the "poles" of the battery; the charge separation has been produced at the expense of some of the chemical energy stored in the battery. Sources of electromotive force are rated in terms of the amount of energy given to each unit of charge passing through the source. The most common unit of electromotive force is the volt, which equals one joule of energy per coulomb of charge.
The electric current is the result of a flow of charged particles through the circuit. Most frequently (but not always) these particles are negatively charged electrons. The unit of electrical current is the coulomb of charge per second, or the ampere.
When charge flows from one point A to another point B in a conducting path, energy is dissipated from the system -- most frequently in the form of heat or light. The amount of energy dissipated per coulomb of charge flowing through the conductor is called the difference in potential between the points A and B. Like electromotive force, potential difference is measured in joules of energy per coulomb of charge, or volts.
Sketching an electrical circuit as we did at the beginning of this procedure is both time consuming and somewhat ambiguous. We typically sketch electrical circuits as schematic diagrams, using standard symbols, some of which are shown below.
The most important principle in current electricity is known as Ohm's Law. This law is always used whenever it is necessary to calculate the relationships between potential difference, resistance, and the current flowing in a circuit.
Ohm's Law states that the value of the current in a conductor is equal to the potential difference (voltage) across the conductor divided by its resistance. Mathematically,
![]() (1)
(1)
where V is the potential difference in volts, R is the resistance of the conductor in ohms, and I is the current measured in amperes.
When there is no source of electromotive force (emf) in a portion of a circuit, the voltage measured across the ends of that portion is equal to the current times the resistance. We often refer to this as the potential drop across that portion of the circuit, because the potential has "dropped" from one point to the other point. Stop and reason for yourself why this is true.
We can also used Ohm's law when we study a circuit with a source of emf and a resistance. In this case, the current flowing in the circuit is obtained by dividing the emf of the circuit by the resistance of the circuit.
EXPERIMANTAL ACTIVITY:
Cautions:
Part A: single resistance circuit
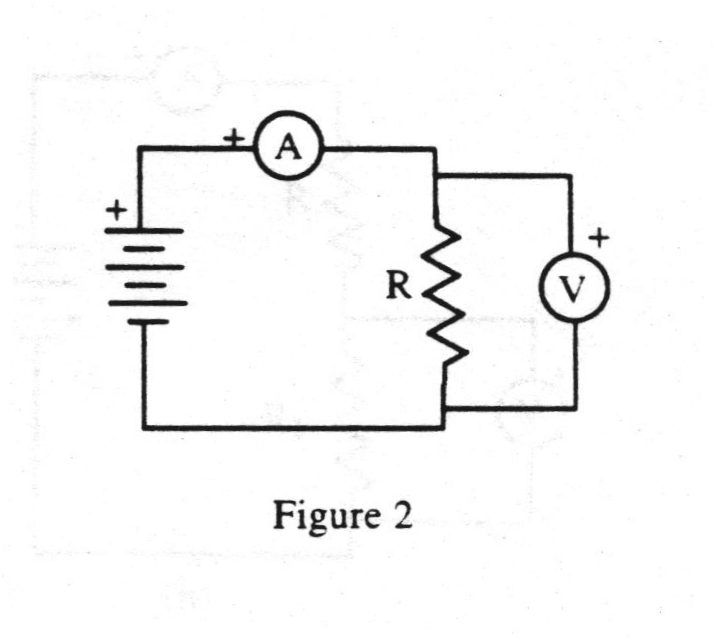
Construct the circuit shown in figure 2 to measure the current and voltage for a single resistor, R. Use a small variable resistor, and set it at about half resistance. It is probably easiest to construct the circuit with just the power supply, resistor, and ammeter first. The ammeter is placed so that current will flow through the meter, observing the proper polarity for the meter to avoid damaging it. The last item positioned in the circuit is the voltmeter, which is connected across the indicated element to measure the potential difference across the ends of the element. Be careful to observe the proper polarity for the voltmeter, and have the instructor check and approve your circuit. (This circuit uses a maximum of five wires.)
When the circuit is approved, turn on the power supply with the voltage control turned to "MIN" or full counterclockwise. Then, gradually increase the voltage control until the voltmeter reads about 2.0 volts. Record both the voltage and current measurements in a data table. Increase the voltage by 2 volt increments, recording values in your table, until you have reached 12 volts.
Turn off the power supply. DO NOT CHANGE THE SETTING OF R. (If you change R, you must repeat the above procedure for the new setting, or your values in later parts of the experiment will be invalid.) Analyze this data by plotting it, using voltage on the horizontal axis and current on the vertical axis. This graph should be linear. Find the slope, which should be 1/R. Determine the value of R and record with the data table.
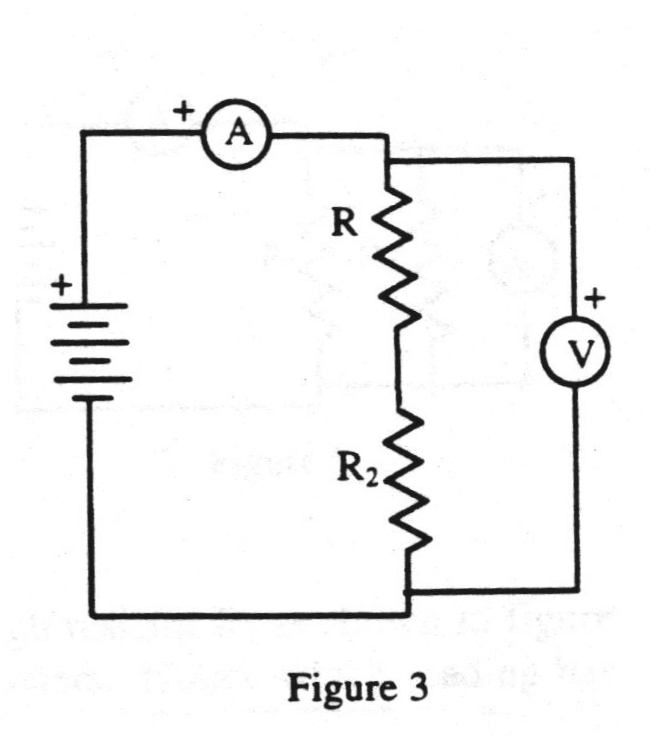
Take the other variable resistor at your workstation (R2) and set it to a midrange value of your choosing. (Once it is set, do not change the setting.) Connect it in series with R as shown in figure 3. Connect the voltmeter across both resistors, so that you are measuring the total potential difference of the series connection. When your circuit has been approved, turn on the power supply and adjust it until the voltmeter reads 12.0 V. Record the reading of both meters in a data table.
Now, turn off the power supply using only the ON-OFF SWITCH. Leave the voltage control knob set, so that it will still be at 12.0 V when you turn it back on. Move the voltmeter leads so that the voltmeter measures the potential difference across only R, the first resistor (See figure 4a). After circuit approval, turn the power supply on, and record the readings in the data table. Notice which reading has changed, and which has not.

Turn the power supply off again, and move the voltmeter leads so that the meter measures across only R2, as shown in figure 4b. When approved, turn the power supply on and record the readings in the data table. Again notice which reading changes. Turn the power supply off.
Analyze this data by using Ohm's Law to compute the resistance of R, R2, and the series combination of both resistors. Record the resistance values in the data table beside the recorded data. Can you determine the relationship of resistances connected in series? This relationship should be part of your conclusions.
Part C: Resistors in Parallel.
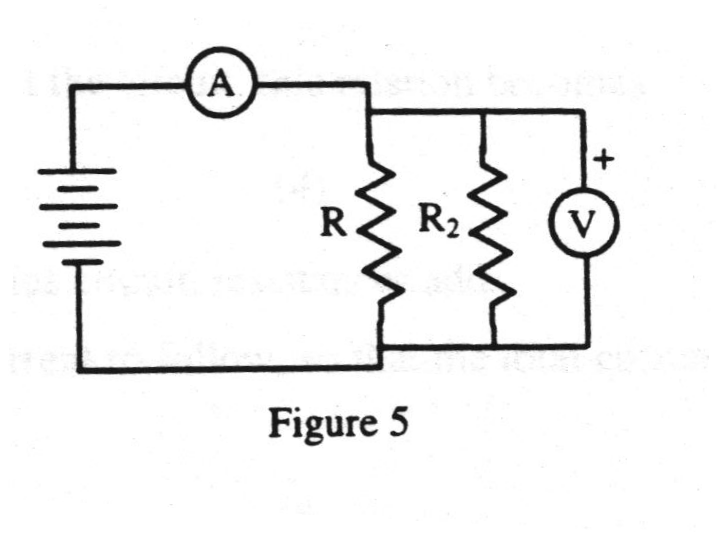
With the power supply turned off, construct the circuit shown in figure 5. In this circuit, R and R2 are connected in parallel, and the meters measure total current and total voltage drop. After your circuit has been approved, set the voltage knob to "MIN" and turn the power supply on. Adjust the voltage to 9.0 V, and record both current and voltage readings in a data table. Use the switch to turn the power supply off.
Now, move the ammeter to measure the current that flows through resistor R, as shown in figure 6a. Turn the power supply on and record the readings of both meters. Notice which reading has changed.
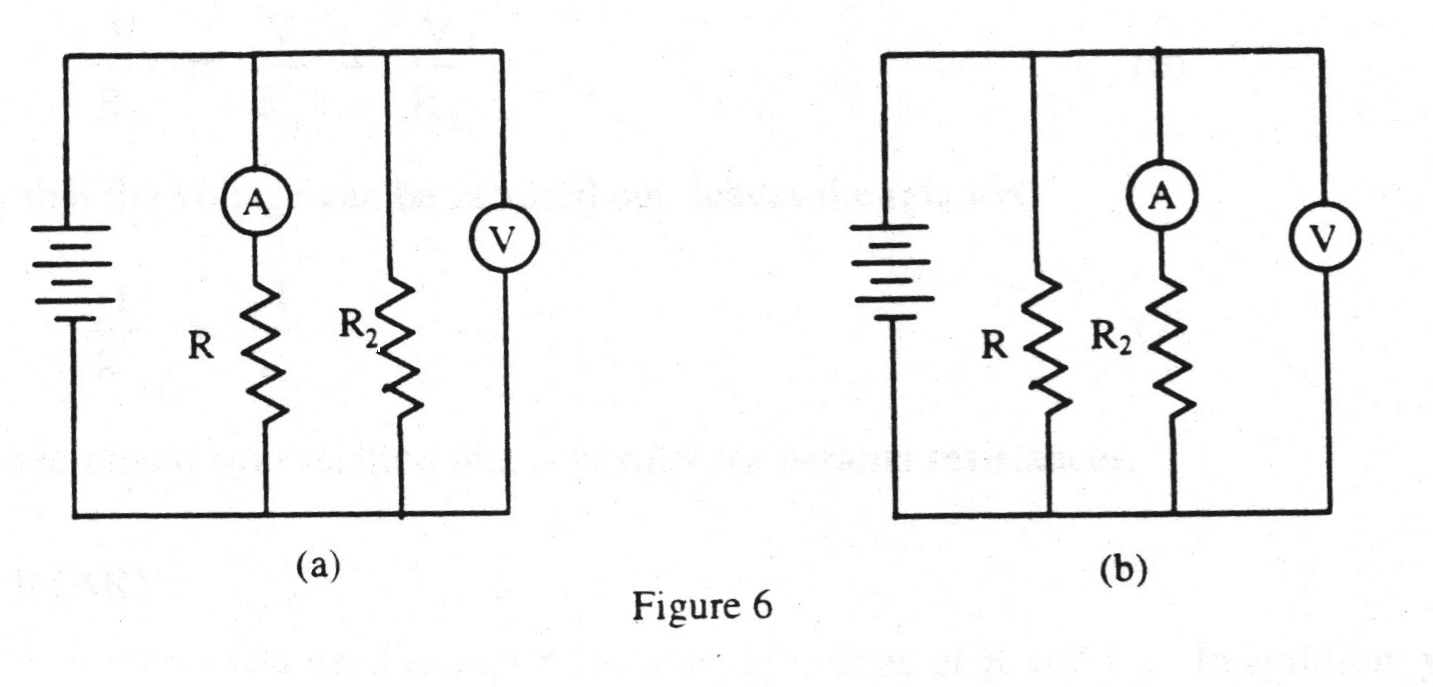
Finally, move the ammeter to measure the current that flows through resistor R2, as shown in figure 6b. Turn on the power supply and record the readings of both meters.
Analyze these data by determining the resistance for each trial. Are your values for R and R2 consistent with earlier parts of the experiment? Is the total resistance of the parallel combination larger or smaller than for the series combination? How does the total resistance for the parallel combination compare with the individual values of R and R2? Can you determine the relationship for resistances in parallel? These concepts should form part of your conclusion for this experiment.
DISCUSSION:
The definition of a series circuit is that a single path exists for current to follow. Thus, the current in each element of a series circuit must be the same. The total voltage drop, however, is the sum of the voltage drops of the circuit elements. Thus,
![]() (2)
(2)
and if we use Ohm's law to substitute for each voltage, we find
![]() (3)
(3)
Recognizing that the current value (I) is the same throughout the circuit, this relation becomes
![]() (4)
(4)
which is the normal relationship for series circuits. In a series circuit, resistances add.
A parallel circuit, on the other hand, has many paths for current to follow, so that the total current is the sum of individual currents, or
![]() (5)
(5)
As you should have noticed, the voltage across the elements in parallel is constant. Thus, when Ohm's Law is used to substitute into relation (5), we get
![]() (6)
(6)
Recognizing that the voltage can be factored out, leaves the relation
![]() (7)
(7)
which is the reciprocal sum relation that is normal for parallel resistances.
FINAL SUMMARY:
In your final summary, you need to report the average values of R and R2. In addition, you need to report the relationships for resistors in series and parallel that you determined from your experiment, as well as report answers to specific questions asked. Try to think of the consequences for these conclusions, as applied to some everyday situations.
In the "Estimates of Accuracy" section, report the percent differences between the measured value for the series combination compared with the theoretical value when one uses the average values of R and R2. Do the same for the parallel combination.