Laser Optics
Click here to see a close-up view of the first part of the experiment
Click here to see a video of the first part of the experiment
Click here to see a close-up view of the second part of the experiment
Click here to see a video of the second part of the experiment
MOTIVATION:
The laser is perhaps one of the greatest of modern technological inventions. From its origins in the laboratory in 1960, it has become one of the most pervasive devices in current society. Lasers are found in Compact Disc players, grocery store checkout counters, construction sites and on surveyor's transits.
Many of the phenomena discussed in the typical optics textbook use the concept of a ray of light to trace the path through optical devices. With the advent of the laser, a convenient source of such rays is available for experimentation. With the laser beam as a ray, geometrical optics can be elegantly used in the laboratory.
But the laser is much more than just a source of light rays. It is also a coherent light source, in which all the light waves are in phase with each other. This allows the use of the laser as a light source for experiments in physical optics, in which diffraction phenomena can be easily worked with. The other great strength of the laser as a light source is that it is very strongly monochromatic, so that the wavelength of the light is very well known. This permits calculations requiring knowledge of the wavelength, such as determining the size of a slit or pinhole.
SPECIFIC OBJECTIVES:
When the student has completed this experimental activity, he should be able to: (1) define the terms refraction, diffraction, and total internal reflection; (2) measure the index of refraction of a liquid; and (3) determine the size of an opening by measurement of diffraction patterns.
A. Determination of Index of Refraction:
THEORY:
When light is traveling from any medium into a vacuum, there is a critical angle of incidence that is associated with internal reflections in the material. When light rays approach the surface of the material at an angle that equals or exceeds this critical angle, no light will emerge but instead all of the light will be reflected internally. Measuring the critical angle of a material is easily done using the fine laser beam. Once the critical angle is known, it is a simple calculation to determine the index of refraction of the material.
EXPERIMENTAL ACTIVITY:
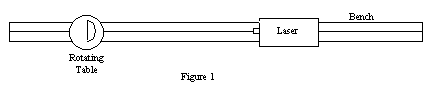
A plastic "D"-shaped tank is filled with water and placed on a protractor atop the rotating table on the optical bench. The laser is also mounted on the bench, and aligned so that the laser beam travels horizontally through the water in the tank. The tank and protractor need to be carefully positioned so that the reference point of the protractor is directly above the axis of the rotating table, to make reading angles easy and direct.
The "D" shape of the tank simplifies angle measurement, as the laser light enters the tank perpendicular to the semi-circular side at all points, and refraction occurs only at the straight side. As the tank is turned, the refraction causes the light to bend further away from the normal as it exits from the tank. Finally, the refracted beam will disappear altogether. Carefully search for the precise angle at which the refracted beam vanishes, and record the angular position. Repeat three times to verify the value.
Now compute the value of the index of refraction of water using the critical angle formula:
 (1)
(1)Compare this value with the index of refraction for water given in your textbook. Note that any liquid could be used in place of the water, and its index computed in the same way.
B. Diffraction of a Circular Aperture
THEORY:
A second experiment is to examine the diffraction of light by a small circular hole, or aperture. In principle this is very similar to diffraction by a single slit. The difference is that where a slit shows diffraction in one dimension, the circular aperture shows a two dimensional diffraction. This is because the interference due to diffraction fringes from the top and bottom of the hole, as well as the sides, occurs in two directions with interference in the are of overlap. The well-defined patterns of this diffraction are easily reproduced for investigation by using the intense monochromatic light of a laser.
EXPERIMENTAL ACTIVITY:
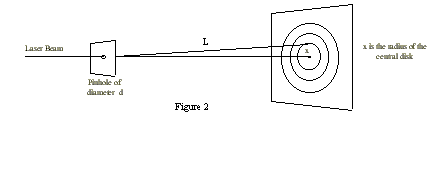
Make a very small pinhole in a fresh piece of aluminum foil. To be sure that the hole is sufficiently small, just use enough pressure to make a needle point penetrate the foil. If the hole has been made properly, a bullseye pattern will be formed on a screen when the laser beam is passed through the hole. A perfectly round pattern on the screen indicates that the pinhole is also perfectly round. Experiment with making your pinholes smaller and smaller. The smaller the pinhole, the larger the bullseye.
Calculate the size of your pinhole by measuring the radius of the Airy disc on the screen. The Airy disc is the central bright disc in the bullseye pattern, named for Sir George Airy who solved the mathematical aspects of the problem. The relationship between the diameter of the pinhole, d, and the angle of the Airy disc is:
 (2)
(2)We can replace sin θ with (x/L), where x is the radius of the central disc and L is the distance from the pinhole to the screen. For the laser, the wavelength of light is 632.8 nm.
QUESTIONS:
Are you surprised at the size of the pinhole you calculated? Why does the Airy disc increase in size as the pinhole gets smaller? How does the size of your pinhole compare with others in the class?
Summarize your findings and note any conclusions you have drawn regarding these experiments.